
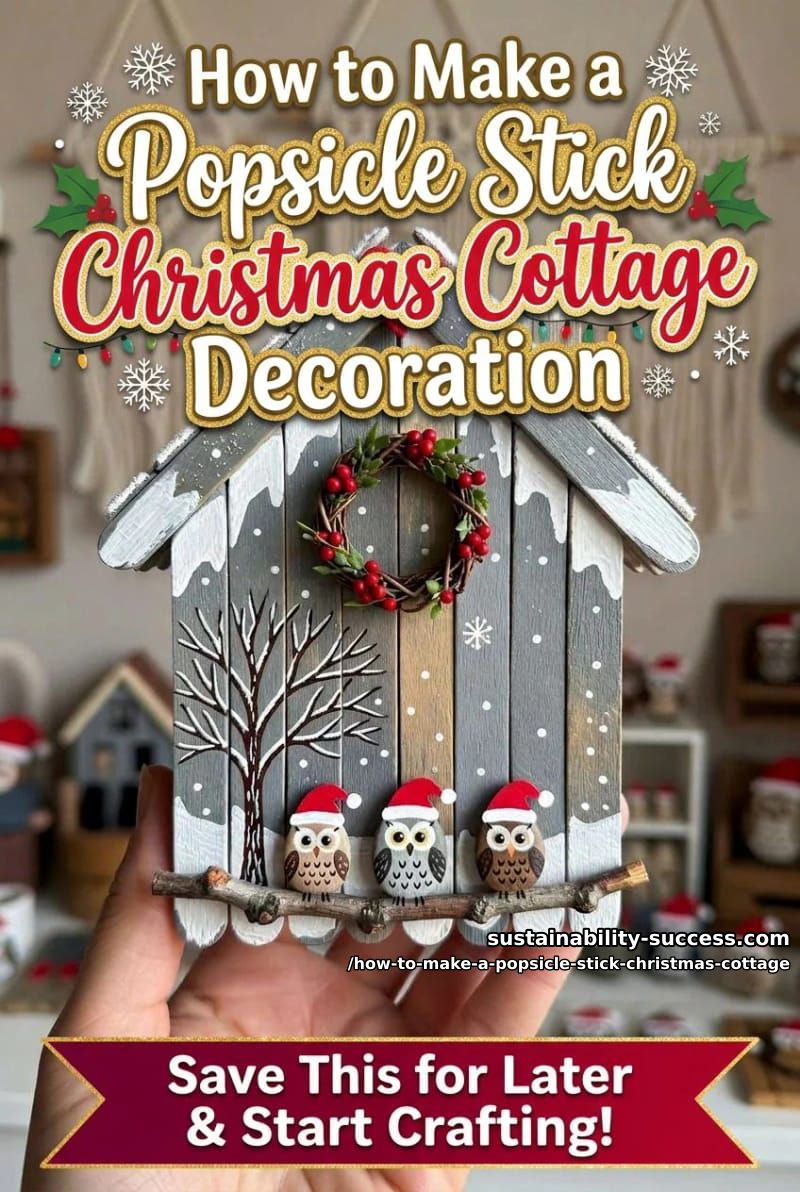
Two evenings, a $14 bundle of birch craft sticks, a handful of river pebbles, and a foraged twig: you end up with a hanging cottage occupied by painted bird tenants in red Santa caps. The thing most tutorials get wrong (and the original maker nailed) is the dry-brushed snow finish over a flat charcoal-gray base. That's what makes the cottage read as winter instead of as a craft-store kit. We're going to copy that finish exactly, then walk through the pebble birds, the twig perch, and the twine wreath on the front.
Why this build works (and what to source where)
It’s technically a popsicle-stick craft. Visually, though, the cottage is borrowing from something much older: the painted Swedish tomtestuga, the little folk houses associated with the household tomte who, in Nordic folklore, looks after the farm in exchange for a bowl of porridge at Christmas. You can still find versions of those painted wooden ornaments at the American Swedish Institute gift shop and at small workshops in the Dala region. The visual grammar , chalky gray base, dry-brushed snow, one shot of red , is what you’re actually copying. You don’t need to pay $60 for the import.
Two material decisions earn this project a spot on a sustainability site. The sticks are FSC-certified birch, meaning the wood was grown and harvested under a third-party audit chain that the Forest Stewardship Council publishes annually. The birds, perch, and wreath ring are foraged: pebbles from a creek bed, a pencil-thick twig from the yard, a small loop of jute. Three of the seven major components cost nothing and replace nothing. That’s the whole anti-fast-decor argument right there.
Decide the silhouette in pencil before you touch glue. Build the cottage front-first, flat on the table, with the roof assembled as a separate X-stack glued on top. Try to do it in 3D as you go and the sticks splay, the roof angle drifts, and you end up swearing at a glue gun. Draw the outline on cardboard, dry-fit every stick on that outline, then glue.
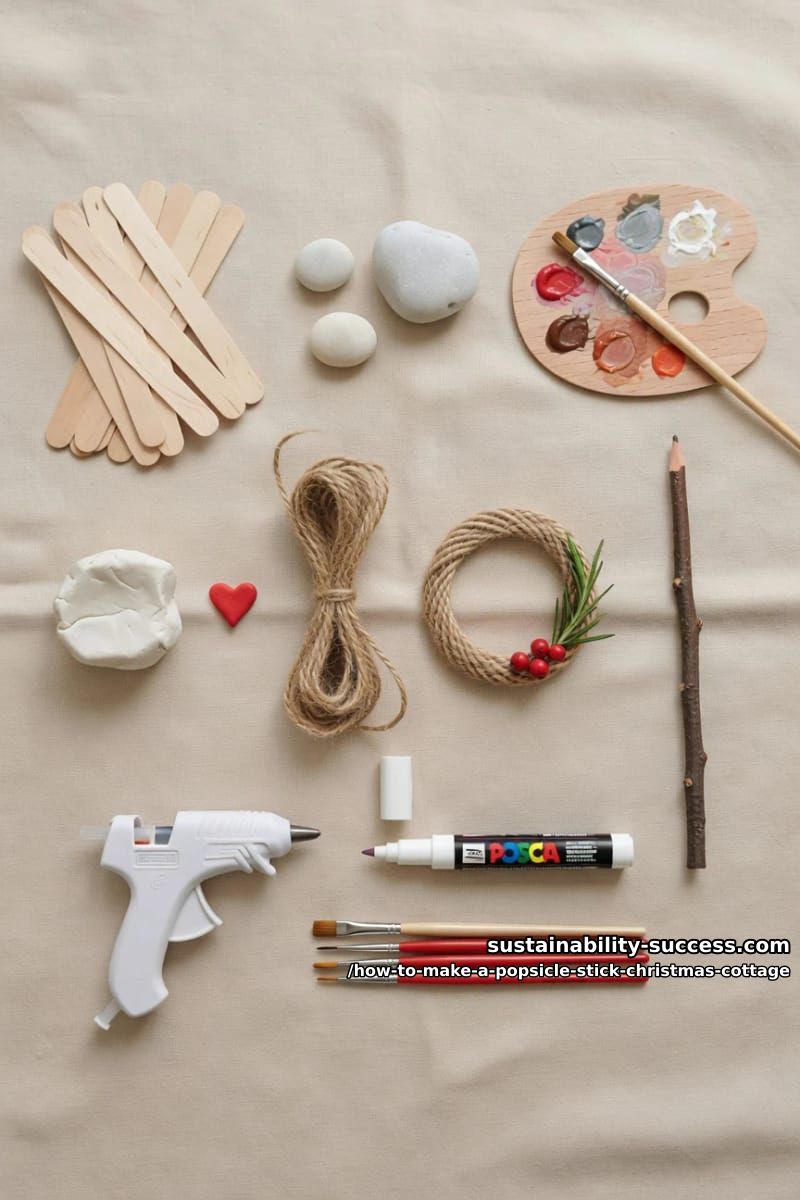
Materials and tools
Costs assume you're starting from zero. If you already have a glue gun, a paint set, and a brush set, the consumables for one cottage come in under $20.
Materials (consumables)
| Qty | Item | Spec | Price |
|---|---|---|---|
| ~30 | CraftySticks 6-inch FSC-certified birch jumbo craft sticks (100 ct) | 6 in x 11/16 in x 2 mm, rounded ends, natural birch | $8 to $12 |
| 1 set | Apple Barrel matte acrylic paint, 12 x 2 oz set | includes white, black, Timeless Gray, Candy Apple, Chocolate Sprinkle, and others; Pavement, Cardinal Crimson, and Nutmeg Brown (the colors named throughout this tutorial) are not in this product, they are in the Apple Barrel Essentials matte set (product 5214E), not in the linked Bold and Bright satin-finish set | $15 to $22 |
| 3 to 5 | Smooth flat river pebbles, sizes 1, 1.5, and 2 inches | foraged from a creek bed if you can; otherwise handpicked 1.5 to 2.5 in flat painting rocks (50 ct) | $0 to $13 |
| 1 | Pencil-thick foraged twig (~5 in) | straight, smooth, dry; dogwood, birch, or maple all fine | $0 |
| 1 spool | Tenn Well natural jute twine, 2mm, 984 ft | 3-ply twisted brown jute, biodegradable | $8 to $12 |
| 1 pack | Red berry and pine picks, 8 stems, 7 in | foam berries, wired stems, fake juniper foliage | $8 to $12 |
| small ball | Sculpey Model Air Dry Clay, white, 2.2 lb | for the red heart; takes acrylic once dry | $5 to $8 |
| 1 | Uni Posca PC-1M extra-fine white paint marker (0.7mm) | snowflakes, lettering, bird eye dots | $5 to $8 |
| 5 to 8 | Mini hot glue sticks | 27 in mini-size, included with the Gorilla kit below | included |
| Materials subtotal | $49 to $87 | ||
Tools (one-time, reusable)
| Qty | Item | Spec | Price |
|---|---|---|---|
| 1 | Gorilla mini hot glue gun with 30 sticks | dual-temp, precision nozzle; low for thin sticks, high for stones | $12 to $16 |
| 1 set | AIEX 9-piece fine detail paint brush set (000 to 6) | synthetic nylon, sizes 000 through 6 for tree branches and bird details | $5 to $9 |
| 1 | Flat 1/2 inch dry-brush (for the snow finish) | stiff bristle; a cheap chip brush is fine | $2 to $4 |
| 1 | Sharp craft knife or wire cutters | for trimming sticks at angle, snipping twine | $0 to $8 |
| Tools subtotal | $19 to $37 | ||
| Combined total (starting from zero) | $68 to $124 | ||
Prices are approximate Amazon ranges as of November 2024; verify before purchase. Twigs and creek pebbles should always be free.
Step 1: Lay out and cut the cottage geometry
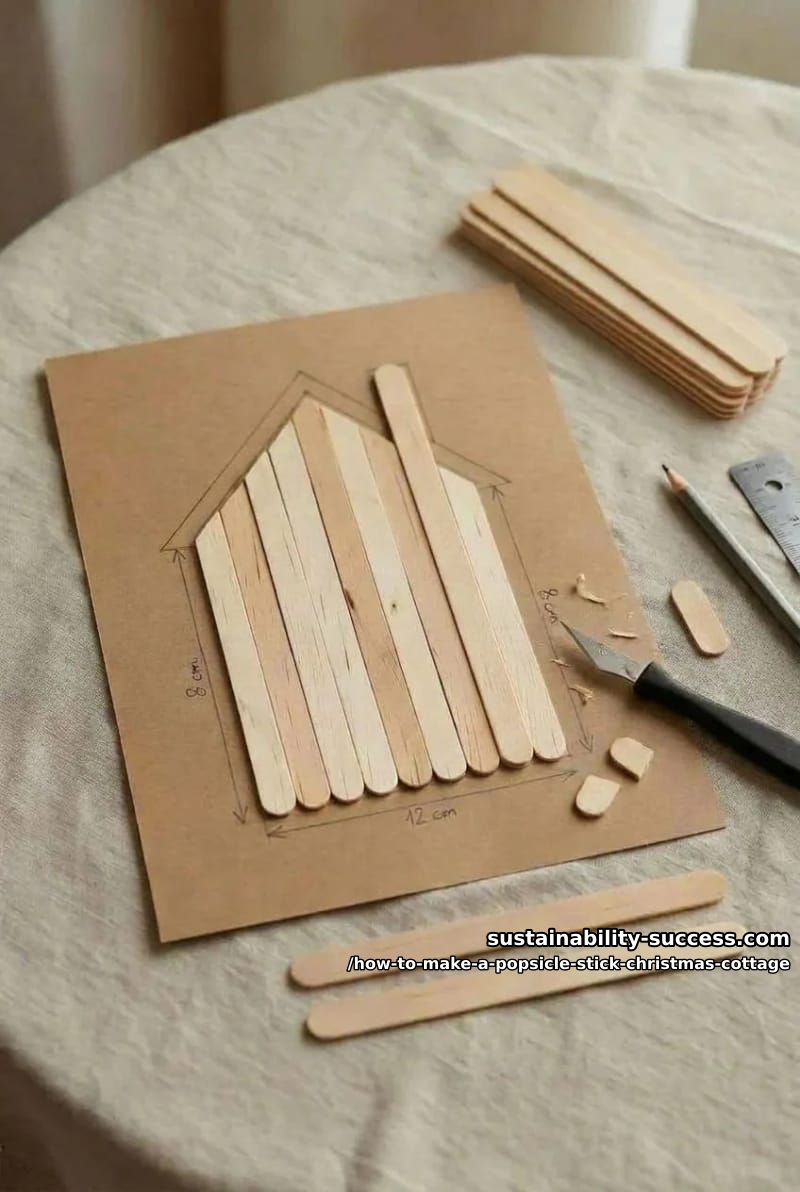
The finished cottage measures roughly 7 inches tall by 6 inches wide. Draw the outline at full size on corrugated cardboard or kraft paper before you touch a glue gun. The cardboard doubles as your template and your work surface , hot glue won't bond to corrugated once it's cured, so the cottage peels off cleanly when you're done.
Front wall, vertical: 8 sticks at full 6 in length, rounded ends top and bottom, glued edge to edge. Panel width comes out to about 5.5 in.
Back braces, horizontal: 2 sticks, cut to 5.5 in (trim one rounded end off each). Top brace catches the upper third of the front panel, bottom brace catches the lower third.
Roof, each gable side: 4 sticks at full 6 in length stacked side by side, rounded ends top and bottom. Two gable sides cross at the apex.
Twig perch: 1 foraged twig, roughly 5.5 in long, pencil thick. Try to keep at least one small Y-branch intact for visual interest.
Total sticks needed: about 18, plus 2 spares for the inevitable splinter. A 100 ct pack is the right buy.
Step 2: Glue the front wall panel
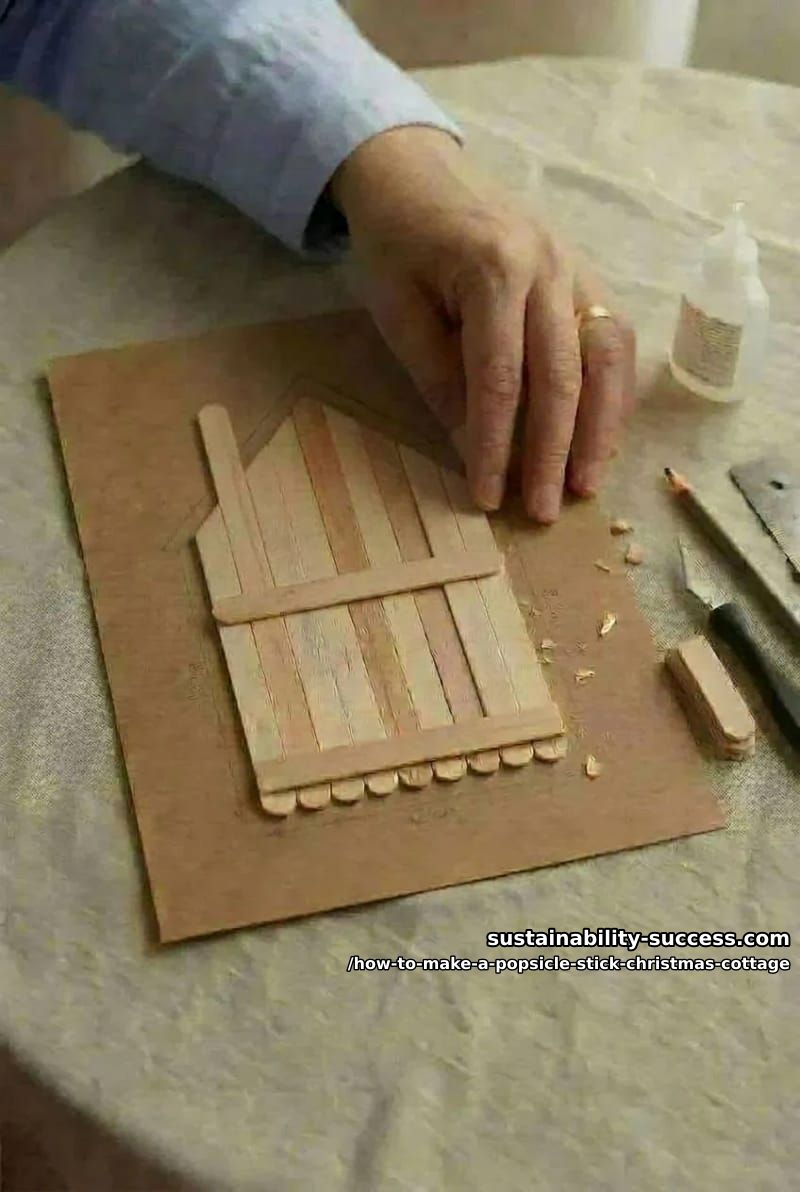
Lay your 8 vertical sticks rounded-end-up on the template, edges touching, no gaps. The rounded tops disappear under the roof, so any wonky ones can be banished now. Cut your two horizontal back braces to 5.5 in, then heat the glue gun. Hot glue sets in about 45 seconds, which is enough time for one brace, not both.
- Square the sticks. Press all 8 vertical sticks against a metal ruler along their bottom edge. The top edge will be slightly uneven from the rounded ends. Don’t worry about it.
- Run the first glue bead. A continuous 5.5 in bead across the back of the sticks, 1.5 in down from the top.
- Seat the top brace. Press the trimmed horizontal stick into the bead, perpendicular to the verticals. Hold for 20 seconds.
- Repeat at the bottom. Second bead 1.5 in up from the bottom, second horizontal brace pressed in.
- Flip and inspect. Turn the panel face-up. Any vertical that has slipped is still rescuable at the 90-second mark , lift it, reseat it.
Don’t use Elmer’s white glue or PVA wood glue for this panel. Both need clamping for at least 30 minutes, and worse, they soak into the porous birch and warp the sticks into a banana shape as they dry. Hot glue is the right call even though the joint is weaker, because the back braces carry the load and the wreath plus birds weigh almost nothing.
Step 3: Build the crossed gable roof
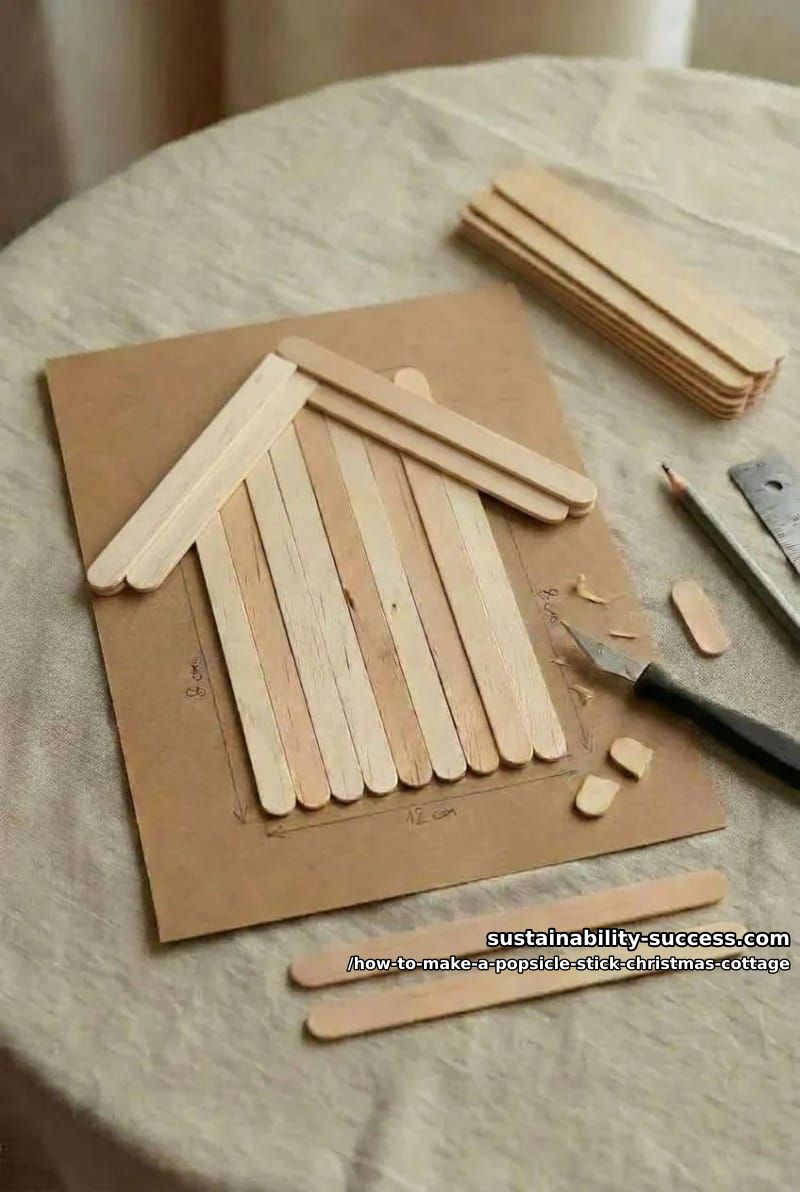
This is the visual signature of the cottage, and the part most copies get wrong. The roof isn't a triangle. It's two stacks of four sticks crossing in an X at the apex, with the rounded ends poking out past the join on both sides. That overhang is the whole reason the silhouette reads as scalloped and organic rather than as a kid's drawing of a house.
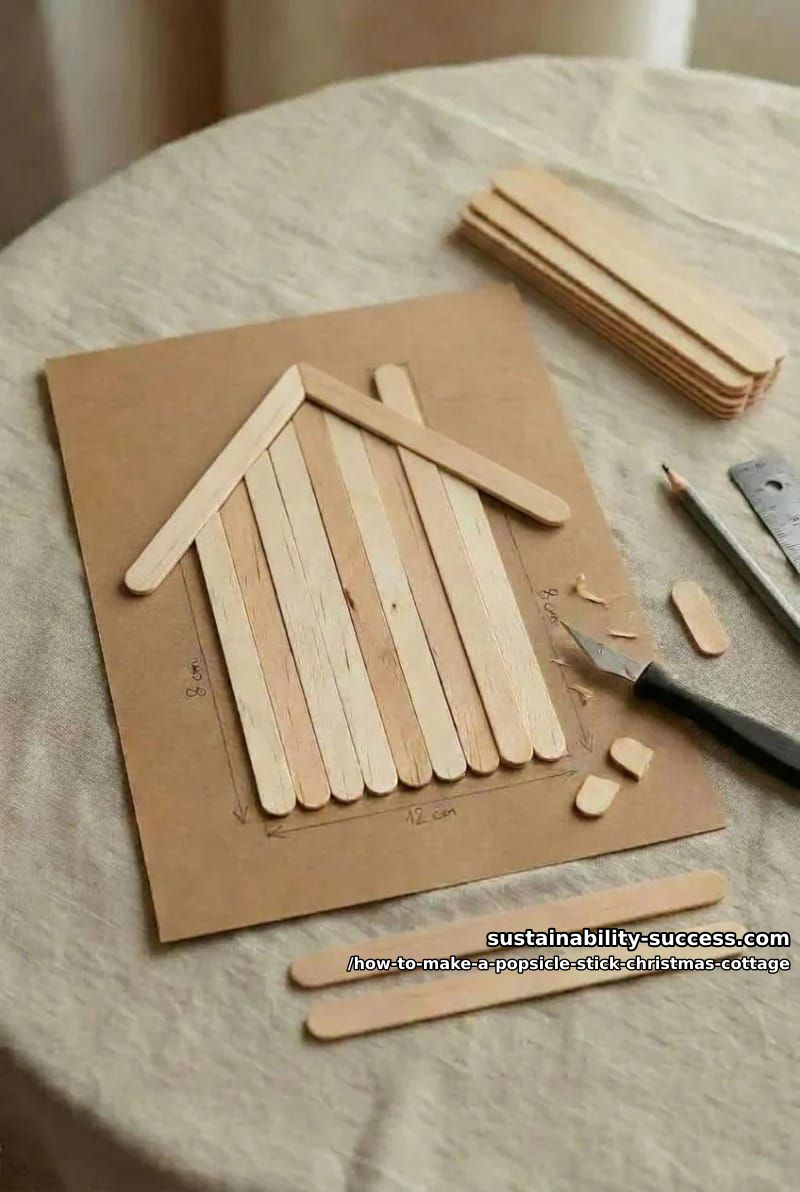
Phase 1, build each gable side separately: Lay 4 sticks side by side, edges touching, rounded ends aligned. Run a 4 in bead of hot glue across the back, 1 in down from one end, and press a short scrap stick across as a binding rail. That’s a four-stick raft.
Phase 2, find the apex: Lay the two rafts on the table in an inverted V. Cross them so each upper end extends past the join by about 1 inch. The angle at the apex wants to be roughly 90 degrees , a right angle, not a sharp peak. Mark the cross with a pencil.
Phase 3, glue the apex: Run hot glue along the contact line where the rafts cross. Press, hold for 30 seconds. The apex is the only joint connecting the two roof halves.
Phase 4, mount the roof on the wall: Hot glue along the top inside edge of each raft. Press the assembled roof down onto the top of the front wall panel. The wall sits inside the V; the rafts extend out and down past the wall edges.
Step 4: Paint the dry-brushed snow finish
This is the step. If you skim everything else in the article, do not skim this. It is the difference between a popsicle cottage that looks like a fifth-grade science project and one that looks like something you'd pay forty dollars for at a Scandinavian gift shop in November.
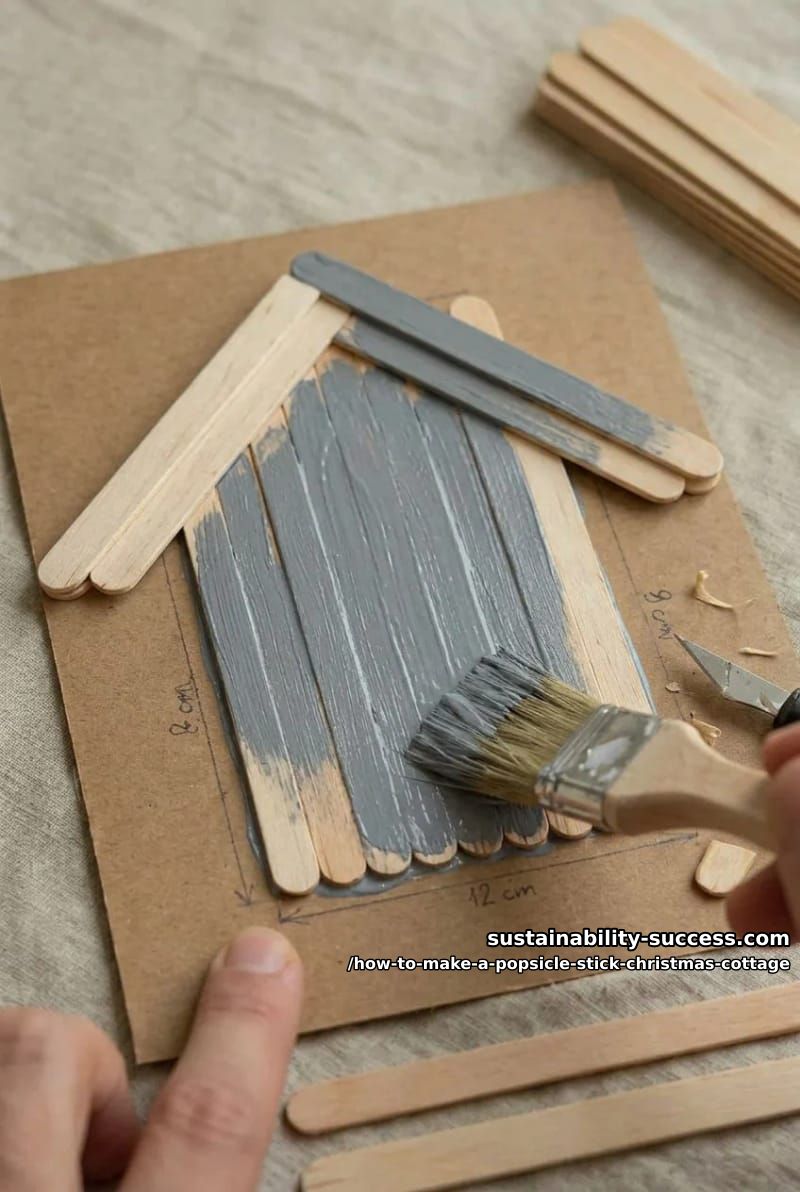
The base is a chalky medium gray , Apple Barrel "Pavement" with a thumbnail of black mixed in to deepen it. The snow effect is dry-brushed white pulled across every stick with a stiff brush you've wiped almost clean on a paper towel. The "almost" is the whole game. A brush with too much paint lays down a coat. A brush with too little catches only on the raised grain of the wood and leaves white in the high spots and gray in the low ones, exactly the way snow settles on a real shingle.
I've watched people overshoot this step by a wide margin. They load the brush, they hesitate, they panic, they wipe more, they second-guess themselves, they reload. The fix is to commit. Wipe the brush past the point where you think it's empty. Then drag.
Do this
- Two thin base coats of gray, 20 minutes between, before any white touches the wood
- Wipe the white-loaded brush on paper towel until it looks empty. Then wipe it again. Then drag across the grain.
- Always brush along the long axis of each stick, with the grain
- Optional final pass: mist a fine spray of white from about 12 inches away for snow-dust
Avoid
- A thick coat of white over wet gray. It muddies into pale lavender and you’ll have to start over.
- Brushing white across the grain , reads as scratched, not snowed
- Painting the back. It’s facing a wall. Don’t.
- Gloss or satin acrylic for the base; you need matte or chalk for the snow to catch
If you prefer a more rustic look, you can skip the paint. If you do, the popsicle stick cottage would look like below:
Step 5: Paint the winter scene
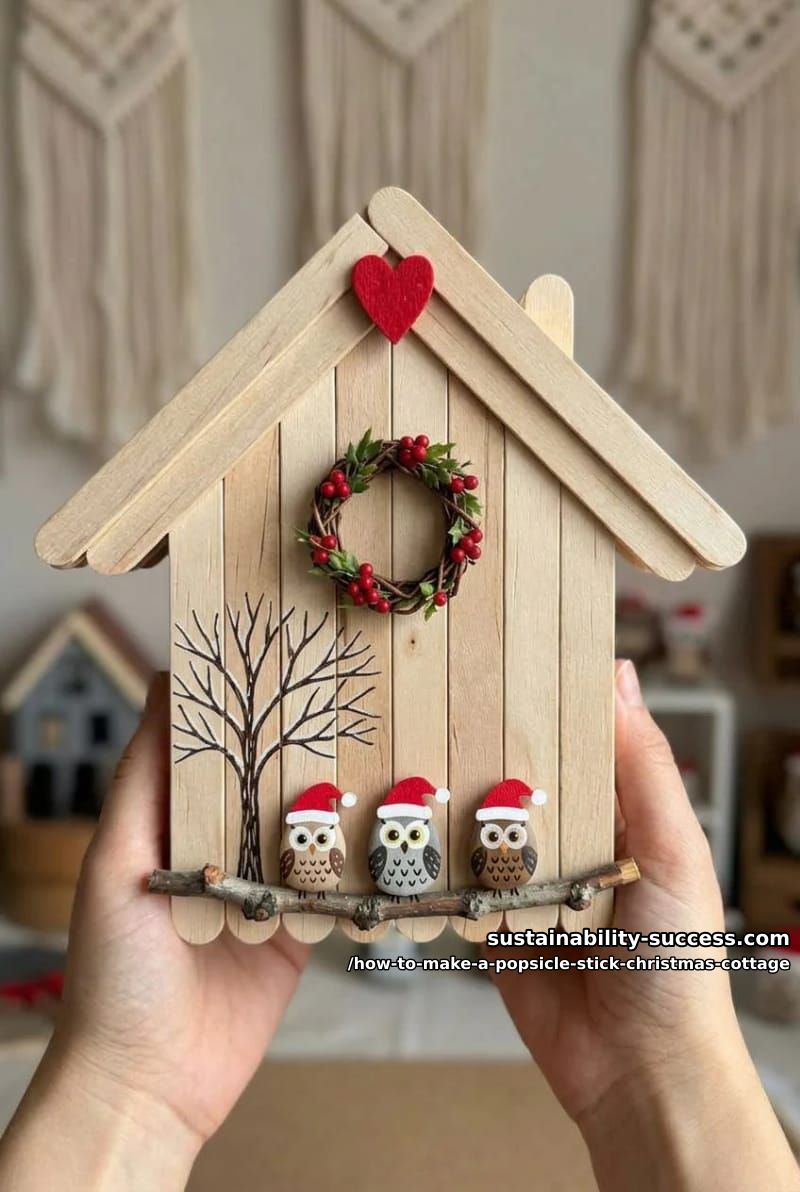
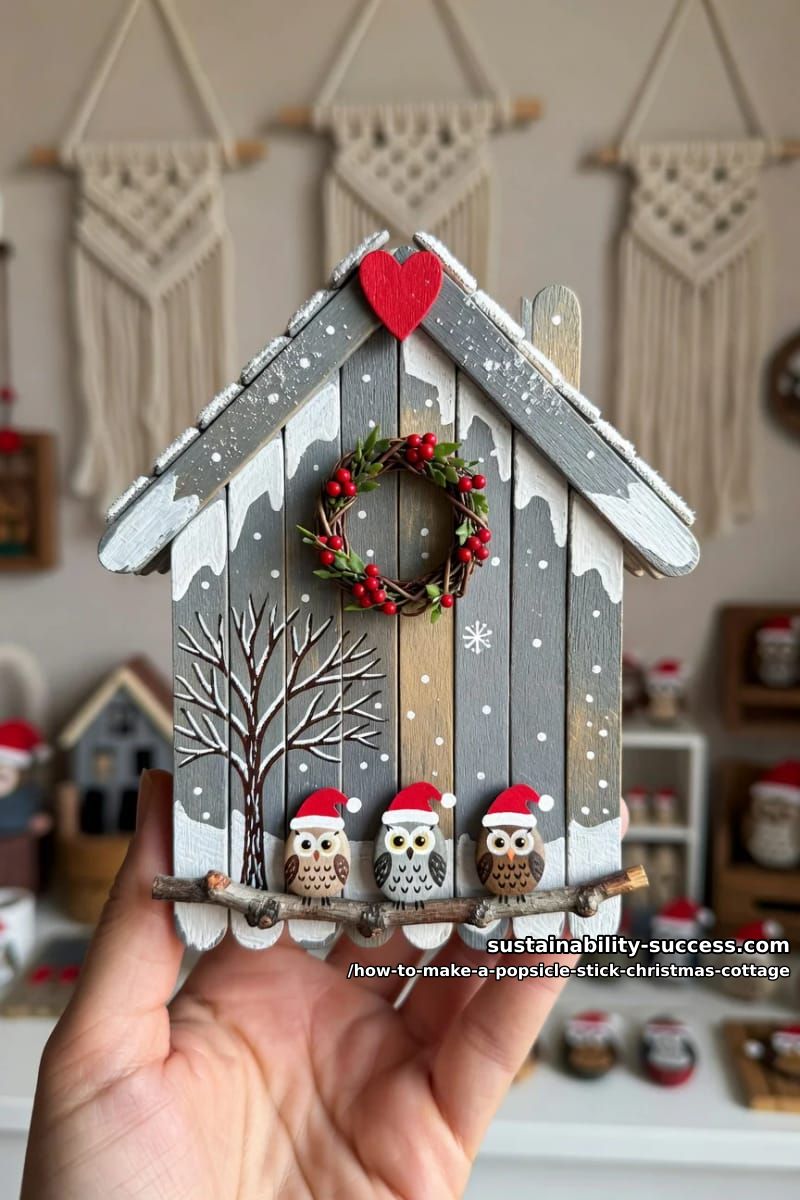
Cottage front fully dry, four things to paint directly on the wood: the bare tree on the left, scattered snowflakes, a small cursive "be happy" on the right, and the implied snow drift at the bottom. None of these are technically hard. The tree is the one people overwork.
Look at the reference. Maybe twenty brushstrokes total. A tapered central trunk, three or four primary branches, five or six secondary twigs. Stop. Stop adding twigs. The negative space is what reads as winter sky , keep adding twigs and the tree becomes a bush.
- Block in the trunk. Burnt umber, size 2 round. A single tapered vertical stroke from the snow line up to about 2/3 of the cottage front’s height.
- Add primary branches. Same brush, same color. 3 to 4 branches forking off at varying angles, always tapering outward , thick at the trunk, thin at the tip.
- Add secondary twigs. Switch to a size 0 detail brush. 5 to 6 small twigs branching off the primaries. Then stop.
- Snow load the branches. Posca white pen or size 000 brush with white acrylic. Thin streak of white along the top edge of each main branch, like accumulated snow.
- Scatter snowflakes across the front. Posca pen. Small six-point asterisks at irregular intervals, simple white dots in between.
- Write the message. Pencil “be happy” lightly first, then trace with the Posca in a casual cursive. Lowercase. No flourishes.
Step 6: Paint the pebble bird family
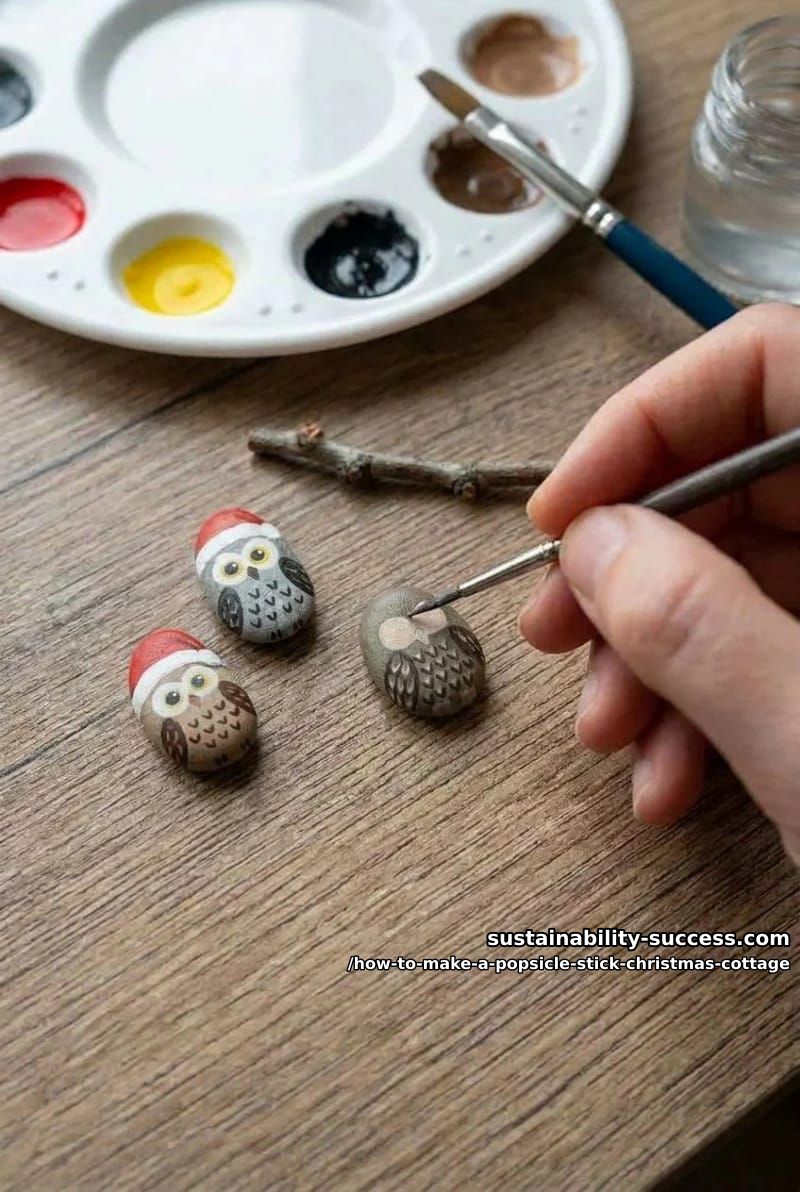
You can tell from across the room whether the maker paid attention to the reference here or just freehanded three birds. The ones in the photo are specific: a medium-sized dark gray adult in the center, a slightly smaller pale gray adult on its left, a small dark juvenile on its right. They all wear the same red Santa cap with a white pompom, but the proportions shift with body size. Pick your three pebbles first , by size , then paint accordingly.
A note on pebble selection that I wish someone had told me the first time. The shape matters more than the color. A perfectly round, smooth, beautiful pebble is the worst one for this project because it has no clear top or bottom. The hat ends up looking like a hat balanced on a marble. You want an egg shape, rounder at the base, narrower at the cap end, flat enough on the bottom to sit on a twig without rolling. Color is paint-fixable. Shape isn't.
Do this for pebble selection
- Flat-bottomed pebbles that sit upright on the twig perch without wobbling
- Egg shape , rounder at the bottom, narrower at the top where the hat goes
- Smooth, not pitted. Pitted stone takes three coats of paint to cover.
- Cool gray or pale beige base color (warm browns fight the red caps)
Avoid
- Perfect spheres , the hat looks like it’s floating
- Quartz or anything sparkly; paint slides off
- River-damp stones. Let them dry indoors for 48 hours before painting.
- Anything bigger than 2 inches. Scale of the cottage breaks.
Base coat the body in cool medium gray, leaving the top third of the stone unpainted (that’s hat territory). Let dry 15 minutes.
Paint the Santa cap in Cardinal Crimson red, covering the top third with a soft scalloped lower edge where red meets gray. A fingertip dab of white at the cap’s tip becomes the pompom.
White cap brim, a horizontal band where red meets gray.
Eyes: two white dots side by side in the upper-middle face, then a smaller black dot inside each, offset slightly toward the center so the bird looks at you and not at the wall.
Beak: small orange triangle below and between the eyes, pointing down.
Chest hearts: 4 to 5 tiny red hearts scattered down the center of the belly (size 000 brush or Posca red pen). This is the folk detail. This is what makes the birds read as Nordic instead of generic Christmas, and skipping it is the single most common mistake.
If you’ve ever tried to paint a 4 mm bird eye with a brush meant for fence posts, you understand why this set exists. Sizes 000 through 6 in one box, cheap enough that you can keep a backup.

Save yourself some time and just use a ready made miniature wreath like the one below:

Step 7: Wreath, heart, and final assembly
The last half hour is where the thing becomes an ornament. Four small components: an air-dry clay heart, a twine wreath, the twig perch with three birds, and the jute hanging loop. Order matters. Glue something to something else that should have gone on first and you'll be peeling stuff back off.
The heart first, because it gates everything. Pinch off a marble-sized ball of white air-dry clay. Roll it into a fat teardrop, flatten slightly, pinch the top center with your fingernail to form the notch. Wax paper, overnight , 8 to 12 hours for a piece this small. Once hard, paint with two coats of red acrylic. Don't try the polymer-clay shortcut unless you have a toaster oven; baking polymer near a glued popsicle cottage is how you end up with a melted apex.
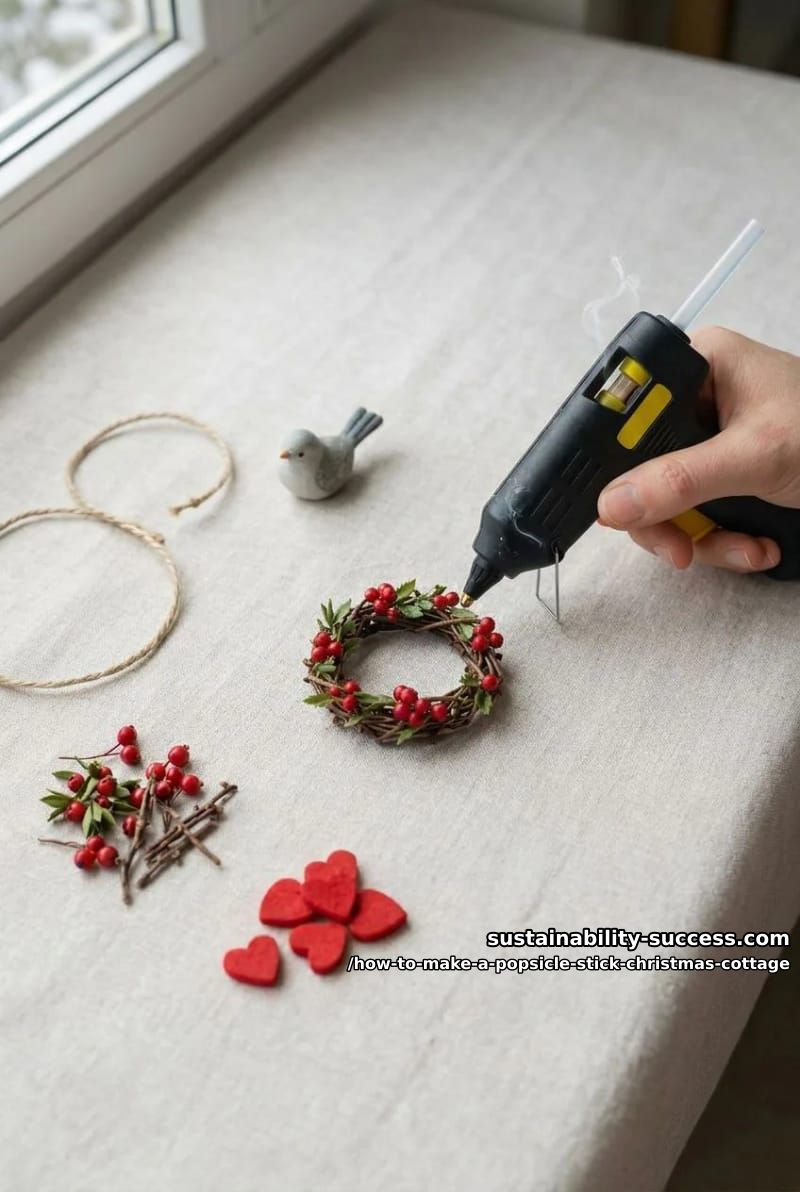
Make the ring. Cut a 16-inch length of jute. Form a 1-inch diameter loop by wrapping the twine around itself 4 to 5 times. Square knot, trim tails.
Add greenery. Snip a 1/2 inch sprig off one of the artificial pine picks. Hot glue it to the bottom-left arc of the ring.
Add berries. Snip 3 small red berries off the pick. Cluster them on top of the greenery and glue.
Add a hanging bow. Tie a tiny separate jute bow and glue it where the wreath will attach to the cottage. That’s how it ends up visually centered below the roof peak.
- Glue the twig perch. Hot glue on the back of the foraged twig, press it horizontally across the cottage front about 2 inches up from the bottom edge.
- Mount the three birds. Hot glue each painted pebble onto the twig, largest in the center, smaller two flanking. Hold each for 15 seconds.
- Attach the wreath. Glue a 3-inch jute hanger to the back of the wreath, then glue the hanger to the cottage front so the wreath floats just above the birds.
- Glue the red heart at the apex. One thumbprint of hot glue, press, 20 seconds.
- Add the cottage hanger. Cut a 10-inch length of jute, knot the ends together into a loop, hot glue the knot to the back of the roof apex.
Mistakes that ruin this cottage
- Painting before assembly. Tempting, because you assume paint is easier on individual sticks. But the dry-brushed snow finish has to flow across the seams to look continuous. Paint after gluing. Always.
- Using craft-store river rocks meant for fish tanks. They’re polished and the paint beads right up. What you want is matte and slightly porous , sold as “kindness rocks” or “painting stones.” Free creek pebbles beat $15 polished ones, every time.
- Roof angle too steep. A 60-degree apex reads as witch’s hat. 90 degrees reads as cottage. The reference photo is roughly 90.
- White paint applied too thick. The snow effect is 90% removed paint and 10% applied. A coat of white means your brush wasn’t dry.
- Hot-gluing the birds before the twig. Birds set at the wrong height; the wreath collides with them when you go to mount it. Twig, then birds, then wreath, then heart, then hanger.
- Skipping the back braces. Without them the front panel bows as the paint dries, and the whole cottage warps into a shallow C-shape that won’t sit flat against a wall.
Build day timing
Two evenings. The clay heart and the gray base coats are what gate the schedule , try to cram both into one evening and you'll be painting wet on wet.
- Day 1, evening (about 90 minutes active): Template, cut and dry-fit sticks, assemble front wall panel, build roof, attach roof to wall. Pinch and shape the clay heart and set it aside on wax paper.
- Day 1, overnight: Clay heart dries 8 to 12 hours.
- Day 2, morning (15 minutes): Paint the heart red, two coats, let dry while you keep going.
- Day 2, afternoon or evening (about 2 hours active): Base coat the cottage gray (2 coats, 20 minutes between). Dry-brush the snow finish. Paint tree, snowflakes, lettering. Paint the three pebble birds.
- Day 2, evening (30 minutes): Build the wreath. Assemble twig perch and birds. Attach wreath, heart, hanger.
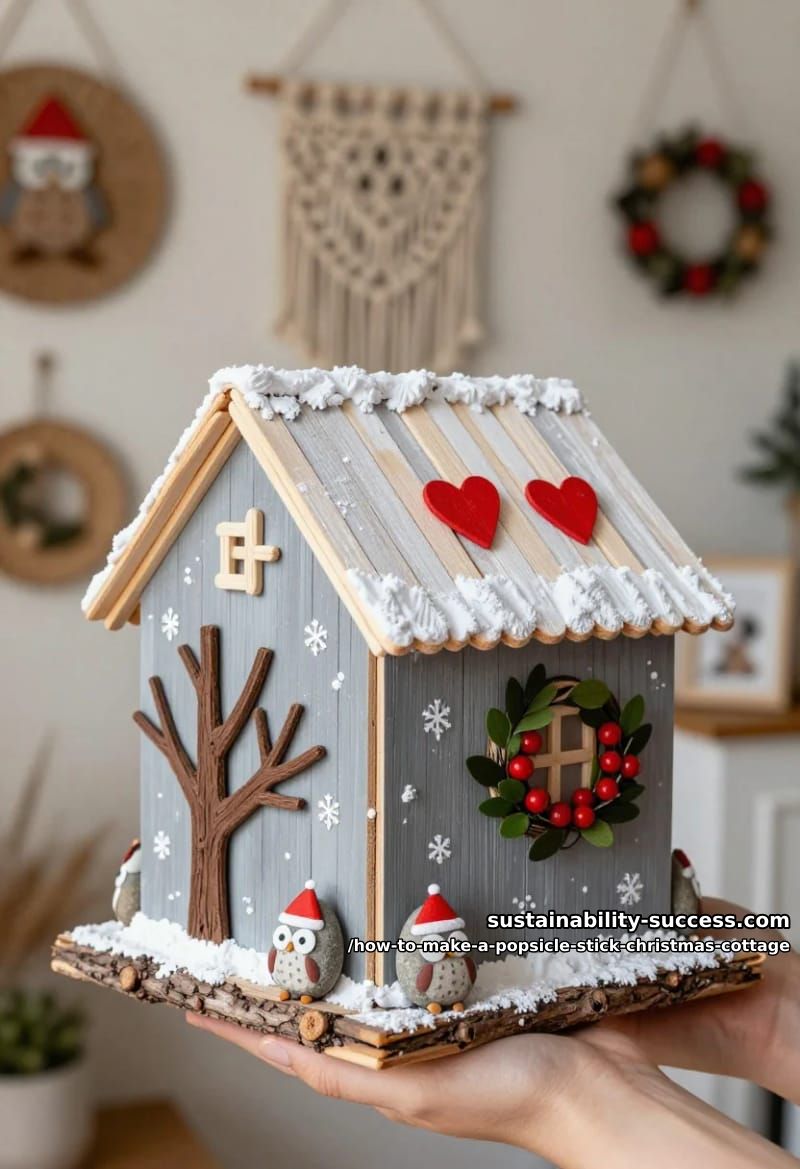
With a similar method it is also possible to make a 3D cottage like the one below made of popsicle sticks.
Conclusion
Store it in a small cardboard box wrapped in tissue between seasons. The dry-brushed white will rub off if you stack the cottage loose with other ornaments, and once it goes, the whole Nordic effect goes with it. Every two or three years, refresh the snow with one more dry-brushed pass. The heart is the part that breaks first because air-dry clay is brittle; when it cracks, pinch a new one and swap it. That repairability is the actual case against a $35 imported wooden ornament made of MDF and hot-stamped print , every piece of this thing is something you can remake in an afternoon. Fifteen Christmases instead of three, and the only part you can't replace is the twig, which you found in the yard anyway.