In this guide, I will explain how to do an RV solar installation DIY. With this beginner’s guide providing step-by-step instructions and a high-level overview, even those without technical knowledge can assemble solar panels, batteries, and other components for an eco-friendly and cost-effective off-grid solution.
By performing a DIY solar installation on your RV rather than hiring a professional you will be able to save money. In addition, you will also gain a better knowledge of your solar system: this can come in handy in case of any future issue while camping. The good news is that by following my step-by-step guide and a high-level overview, anyone can perform this task without needing to know all the technical details!
The setup includes assembling solar panels, charge controllers, batteries, and inverters. This DIY solar setup provides an eco-friendly and cost-effective solution for RV owners.
RV Solar Installation DIY: Preparation

Before to start installing a solar system in a camper van or RV, let’s make sure that you have all the needed components and tools! In addition, I will give you a quick guide for your solar RV setup and how to properly size your RV solar system. Then you will be ready to proceed with the RV solar panel installation.
If you already have all the necessary components for your solar setup, you can skip this section.
1. Equipment Needed
Now, let’s dive into the equipment you’ll need for your DIY solar setup!
Solar Panels
Before drilling any holes on your roof:
- Plan out the placement of your solar panels and ensure they fit correctly.
- Make sure each panel can be securely fastened with mounting brackets.
It’s important to triple-check these steps to avoid any potential mishaps and ensure maximum efficiency for your solar system.
I wrote a dedicated guide with the best RV solar panels, you should check it out if you didn’t purchase your panels yet. By the way, in my experience, those are the best solar panels for RVs:
Charge Controller
The charge controller is connected to the solar panel and regulates the voltage and current coming from the panel to the battery. It’s important to have the correct size of the charge controller for your solar panels and batteries.
Here are the best RV solar charge controllers:
Batteries
When selecting batteries, remember to calculate how much energy your devices require and how long you will use them.
Batteries come in different sizes, and it’s essential to choose the right size for your rig: make sure that the batteries can fit in the desired location in your RV.
I also wrote extensively about the best RV batteries for solar, given the required investment, you should have a look at this detailed guide to avoid any costly mistakes. If instead, you don’t have time, here are the best batteries for an RV solar system:
Inverter/Charger
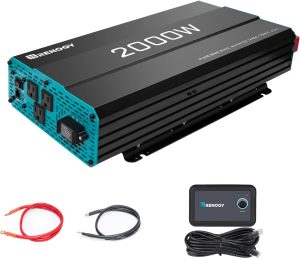
An inverter/charger is a must-have if you want the comfort of home inside your RV. It converts DC power from the battery to AC power used by your devices. Ask yourself what devices you plan to power and how much you want it to feel like home. If you still don’t have it, then here’s the best RV inverter for you:
★★★★★ 4.5
The Renogy Pure Sine Wave Inverter is a high-powered and efficient converter that transforms 12V DC power into 120V AC power.
With its advanced technology and reliable performance, it protects and extends the life of your electronics and appliances. Its safety features and convenience make it a perfect choice for powering your home, RV, truck, or off-grid solar system.
Pros:
- Options up to 3000W
- Quiet operation
- Reliable and durable
- Easy installation
- Efficient energy conversion
- Protects electronics
- Includes USB port
Cons:
- The fan can be a bit noisy
Other Necessary Accessories
For the proper setup of your system, in addition to the key components, don’t forget to gather the necessary cables, connectors, and fuses that are appropriately sized to fit your equipment requirements. To properly install everything, be sure to have a screwdriver, socket wrenches, and small/large crescent wrenches on hand to assist in completing all the connections with precision.
2. Sizing the Solar System for Your RV
Sizing the solar system is the most crucial part to prepare your installation. It involves calculating your energy needs and selecting appropriate components. You need to know how much energy your devices require, how many hours you’ll be using them, and how many days you plan to stay off-grid.
Calculating Energy Needs
Before installing a solar power system, it’s important to assess your energy needs. This involves determining how much electricity you use on a daily basis, especially when you’re off-grid. Your energy requirements will vary depending on what appliances you plan on using, how many people will be traveling with you, and what time of year it is.
To calculate your energy needs, you can add up the wattage of each appliance you plan on running and then multiply it by the number of hours it will be in use. For example, you may want to run the following:
- A 40 watts refrigerator for 24h
- Charge a laptop for 2h with a 27-watt charger
Here’s how to calculate your daily energy needs:
40 watt * 24h + 27 watt * 2h = 1,014 Wh = 1 kWh
So your daily consumption is 1 kWh, however, there are some inefficiencies to account for, so it is standard practice to increase this value by 20%. This means that your solar system should be able to produce about:
1 kWh * 1.2 = 1.2 kWh
This means that if in your area you have about 5h of peak sun per day, you will need at least 1.2 kWh / 5h = 240 watts of solar panels to replenish the consumed electricity every day. This can be rounded up to 300 watts of solar, just to get a bit of resilience.
Finally, to calculate the size of the battery you need, simply divide your required power by the voltage of the battery bank. For example, if you have a 12V battery:
1.2 kWh / 12 V = 100 Ah
So you will need a battery bank with a capacity of about 100 Ah to power the above appliances. Depending on your needs, you can increase the battery capacity if you want to be resilient to bad weather.
There you have it, now you know how to size the solar system for your RV based on your expected energy consumption.
How many solar panels do you need?
Considering the above example, if you choose 300 watts solar panels, you will need only 1 of them, because your energy needs are about 1.2 kWh and you have 5h of peak sun time per day. So, any solar panel above 240 watts will make it. Just keep in mind that this is just an example and that it all starts with calculating your expected power consumption!
Here’s a more detailed guide to calculating the number of solar panels you need.
Selecting Appropriate Components
Once you have an estimate of your energy consumption, you can choose the appropriate components for your solar power system. The first component you need is solar panels.
When setting up a solar panel system, it’s important to choose the right panel and charge controller. The panel should be powerful enough for your needs, and the controller should regulate energy flow and protect your batteries from damage. Ensure they are compatible with each other to ensure optimal performance.
3. Parallel VS Series solar panel installation
The installation type can also influence the efficiency of your system. If you are installing solar panels in an area that could be subject to shade, you should opt for a parallel installation or a hybrid serial and parallel system. This is because with a series installation if one of your solar panels is shaded, then you will lose the power from the entire array.
When you connect your solar panels in series if one of the panels is not working because it is being shaded, the panel will interrupt the circuit, therefore also all the power that could have been generated by the other connected panels will be lost.
This doesn’t happen if you connect the panels in parallel. However, the installation in parallel is more challenging because you will need to install a combiner box or a branch connector and make that waterproof. In addition, you will require a larger charge controller to handle the combined currents. This can get pricey!
A popular solution to reduce shading issues is having panels installed in 2 or more series. For example, you can have a series at the front and one at the back of the RV. Those 2 series can then be connected in parallel to the controller (hybrid system).
In this way, if only the front of your camper is shaded, you will only lose the power generated by the solar array that is there, while the rest of the panels will keep working.
But by far the best solution for shading problems (if you can afford it) is to have one solar charge controller per panel. In this way, only the shaded panel will be cut off, while the others will keep producing electricity. This all depends on how many partial shading issues you expect to have during your trips.
Note that a hybrid installation will also protect you against the fault of a panel or wire, because if your panels are all in series, any fault along the series will result in you loosing the entire array.
Your installation type will determine the number of solar charge controllers needed for your system.
Solar Installation Instructions for RVs
Once you decided how to wire your solar panels and you have all the necessary components, you can start the installation. This is quite straightforward as long as you are careful with what you are doing.
1. Mounting and Securing the Panels
Mounting the solar panels securely on your RV’s roof is crucial for optimal performance. After measuring and working out where the panels will go, attach the mounting brackets to each panel, making sure they are level and secure.
Then, use self-tapping screws to attach the mounting brackets to the roof, taking care not to drill too far and damage the roof underneath.
2. Wiring the System
Wiring the solar power system involves getting wires from the roof of the RV to the battery compartment. This can be the most challenging part of the installation process.
It’s important to use the correct gauge wires, and wiring the panels in series or parallel can optimize the energy output. Once the wires are securely routed, connect them to the charge controller, batteries, and inverter.
When connecting the components, make sure to respect the polarity of the components or you risk making costly damages.
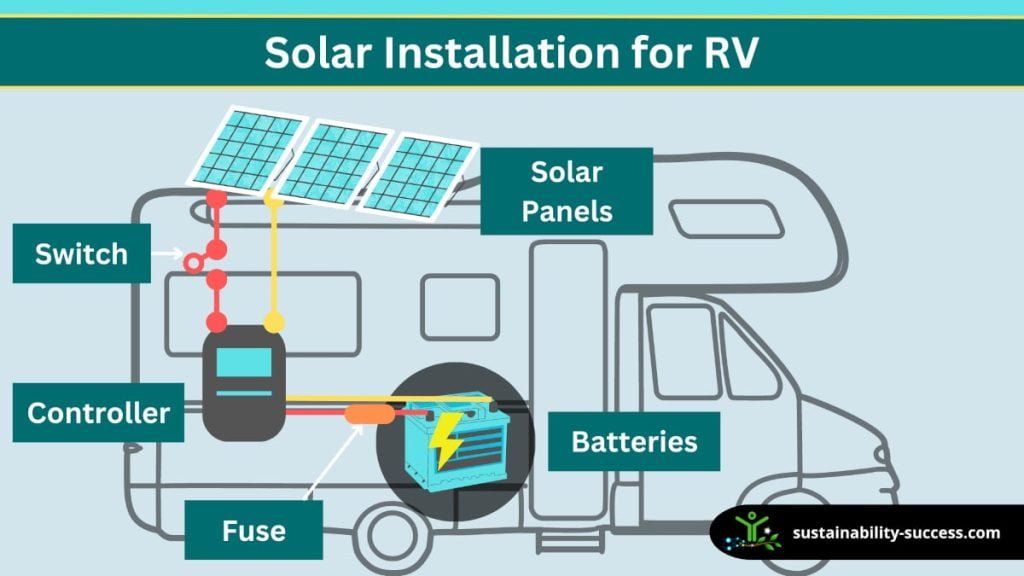
Also, you should be using a fuse on the circuit going into the battery for safety reasons, and a switch to turn off the power to the solar controller when needed.
All external cabling should be 100% waterproof. Use solar cables, and the connectors need to be specific to be sure that the cables are watertight. Also, ensure that the clamping tools and connectors are the right size to avoid damage to the cables.
Remember to seal correctly the entire installation and make it waterproof. The last thing you want is a leaking RV roof or a short circuit in your solar system!
3. Connecting the Components
After wiring the system, you can connect the components. Proceed in this order:
- Cover the solar panels so that they don’t receive any light.
- Connect the charge controller to the battery.
- Connect the inverter to the battery.
- Connect the solar panels to the charge controller.
- Uncover the solar panels and check if everything is working fine.
- Plug in your devices and appliances.
There you have it! If you did everything correctly, you finished your RV solar installation DIY.
Testing and Maintenance
Troubleshooting Common Issues
To keep your solar power system running smoothly, regular maintenance and troubleshooting are essential. Common issues include wiring problems, faulty connections, and low battery voltage.
Be sure to test your system regularly and address any issues promptly to prevent damage to your equipment.
Regular Maintenance
Regular maintenance such as cleaning the solar panels and checking the charge controller and battery levels can prolong the lifespan of your solar power system. It’s important to keep your system in good condition to prevent costly repairs and ensure that you always have power when you need it.
FAQ
How many solar panels for RV power?
If you’re looking to power your RV using solar panels, you need to think about your battery’s storage capacity. As a general rule, you’ll want around 300 watts of solar panel power for every 100 Amp Hours of battery storage. So, if you’re using two 12-volt batteries with a total Amp Hour of between 200 and 250, you should aim for at least 600 watts of solar panel output.
Number of solar panels for 50A RV?
If you have an RV with 50 amp-hour battery storage, you’ll need around 150 watts of solar panel power to keep it running. This can be achieved with one or two 100 watt solar panels, which will provide enough energy to recharge your RV’s batteries during the day and keep them topped up overnight.
It’s important to match the wattage of your solar panels with the capacity of your battery bank, to ensure that you have enough power to meet your needs. Using a solar calculator can help you determine how many panels you need for your RV.
Conclusion
And there you have it – your very own RV solar installation DIY! With just a few basic tools, a little bit of elbow grease, and this beginner’s guide, you’ll be well on your way to harnessing the power of the sun. Not only will you be reducing your carbon footprint and saving money on electricity, but you’ll also be able to enjoy the freedom of not being tethered to traditional power sources.
If instead, you want a portable solar generator, then there are interesting solutions available in the market, check it out in my other blog post.
So what are you waiting for? Grab your toolkit, roll up your sleeves, and start building your own sustainable energy source with RV solar installation DIY. Who knows – you may just inspire others to follow in your footsteps and make their own contribution to a cleaner, greener world!


